
Llegó Julio y con él la sorpresa de haber quedado seleccionada para formar parte del Equipo de Diseño de Carolina Ghelfi Scrapbooking.
¡Estoy feliz!
................................................................................
July came and with him came the surprise of being selected to be part of the Design Team of Carolina Ghelfi Scrapbooking.
I'm so happy!
................................................................................
July came and with him came the surprise of being selected to be part of the Design Team of Carolina Ghelfi Scrapbooking.
I'm so happy!

A partir de este mes y hasta diciembre, estaré trabajando junto a Carolina Ghelfi, Alejandra Hidalgo, Alejandra De Lisio y Cristina Mateos en este Equipo. ¡Nos esperan muchas aventuras creativas juntas! <3
Nuestro primer proyecto para el E.D. fue la participación como Artistas Invitadas en el primer Caso de CSI de Julio.
................................................................................
From this month and until December, I will be working along with Carolina Ghelfi, Alejandra Hidalgo, Alejandra De Lisio and Cristina Mateos in this wonderful team!
................................................................................
El caso es el #169 y así es como lo resolví utilizando materiales CGS:
................................................................................
This is how I solved Case #169 using CGS supplies:

Para cada Caso, CSI siempre ofrece opciones increíbles, a modo de consigna, para componer el LO (layout/página) de Scrapbooking.
TODO esto se puede utilizar para completar este caso! Carolina se tomó el trabajo de traducir todo al español para que sea más fácil para todas. Genial, o no? Ya no tienen excusas para no participar!

Estas fueron las opciones que elegí aplicar:
................................................................................
For each Case, CSI always offer amazing ideas to create the Scrapboking Layout.
This is ALL you can use to solve the case! Carolina translated everything into spanish so it's easier to understand. Now you don't have any excuse to not try this! :)

Para este caso también teníamos un Sketch para inspirarnos. Como yo no tenía otra foto de este mismo momento, lo que hice fue repetirla, pero bajándole el contraste y subiéndole la luminosidad. De esta forma, la foto del centro es la que más llama la atención.
Elegí también ubicar todos los elementos decorativos cerca y alrededor de la foto central, para darle aún más énfasis e interés.
................................................................................
For this Case we also had a Sketch as inspiration. As I didn't had another photograph of this captured moment, I repited and edited the photo, changing contrast and luminosity. This way, the photo in the middle is the one that captures all the attention.
I also choose to apply all the embellishments near and around the central photograph, to emphasize and give more interest to it.

Detalle del título y relato.
Cada tira de papel tiene los bordes desgastados, incluso las que están debajo de las fotos. Esto puede lograrse con el filo de una tijera o con una lija.
................................................................................
Detail of the title and journaling.
Each scrap of paper has worn edges, even those behind the photographs. This can be made with the edge of a pair of scissors or a piece of sandpaper.
................................................................................
Ahora quiero mostrarles un pequeño paso a paso de cómo creé algunos elementos de esta página y para que vean lo versátiles que son los materiales.
................................................................................
Now I want to show you a little tutorial of how I created some of the embellishments/elements of this Scrapbooking LO.
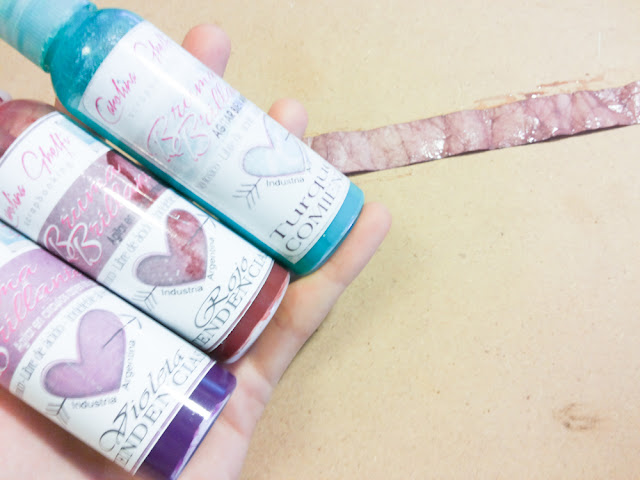
Para crear el color Marrón Cobrizo Oscuro mezclé tres colores de Brumas Brillantes en un frasquito. Esos colores fueron: Violeta Tendencias, Rojo Tendencias y Turquesa Comienzos.
Tomé una tira de papel de la lámina Beige de la Línea Comienzos, la hice un bollito y la metí en el frasquito con la mezcla de brumas.
Al haberla arrugado, se logra que el papel absorba el color de manera distinta que en las partes lisas. Queda un efecto como de papel reciclado.
Utilicé la misma técnica para crear uno de los banderines del centro de la página y la base de la palabra Ninjas, y también pinté un Cuadradito de Madera Autoadhesivo así quedaba bien al tono.
................................................................................
In order to create the Dark Redish Brown color, I mixed in a little jar three Brumas Brillantes. The colors I mixed were: Tendencias Violet, Tendencias Red and Comienzos Turquoise.
I took a long scrap of paper of the Comienzos Beige 12'' x 12'' sheet, I wrinkled it and throw it into the jar.
This way the paper is stained and looks like recicled paper.
I used the same technique to create one of the pennants and the base of the word "Ninjas", and I used the color mix to paint one Wooden self-adhesive Square.
................................................................................
También quiero mostrarles cómo utilicé las Brumas Brillantes junto con el Stencil Rejilla.
................................................................................
Also, I want to show you how I used some of the Brumas Brillantes with the rack Stencil.

Como ya había pegado varios de los elementos sobre la página y no quería que se manchen, en lugar de utilizar la bruma directamente como spray lo que hice fue aplicarla sobre una esponjita y con esa esponjita fui ponceando suavemente sobre el stencil.
Así pude controlar mucho mejor en qué sectores quería que quede la textura de la bruma y en cuáles no.
................................................................................
As I already had glued some ot the elements on the LO and I didn't want them to stain, instead of using the Bruma directly as a spray, what I did was apply some of it on a sponge and with that sponge I tapped softly on the stencil.
This way I could control better wich sections I wanted texture in and wich not.
................................................................................
Espero que tanto la página como este post les hayan gustado y que se animen a participar en CSI y en el hermoso Club CGS, donde también se comparten los casos traducidos al español así es más fácil entenderlos y resolverlos.
Al final del post les dejo la lista de materiales CGS utilizados con los links a la Tienda Online donde pueden adquirirlos.
Muchas gracias por pasar por aquí y participar comentando si es que este post te gustó y quisieras ver más trabajos o tutoriales parecidos.
¡Hasta la próxima!
................................................................................
I hope that you like this post and LO and I encourage you to participate in CSI and the wonderful CGS Club, were you will find the CSI cases translated to spanish, so it's easier to understand and solve them.
At the end of this post you will find the list of CGS supplies I used to create this page, with links to the online Shop were you can buy them.
Thank you very much for stopping by! Comment below if you liked this post and if you'd like to see more of these proyects and tutorials.
Till the next post!
................................................................................
Nuestro primer proyecto para el E.D. fue la participación como Artistas Invitadas en el primer Caso de CSI de Julio.
................................................................................
From this month and until December, I will be working along with Carolina Ghelfi, Alejandra Hidalgo, Alejandra De Lisio and Cristina Mateos in this wonderful team!
................................................................................
El caso es el #169 y así es como lo resolví utilizando materiales CGS:
................................................................................
This is how I solved Case #169 using CGS supplies:

TODO esto se puede utilizar para completar este caso! Carolina se tomó el trabajo de traducir todo al español para que sea más fácil para todas. Genial, o no? Ya no tienen excusas para no participar!

Estas fueron las opciones que elegí aplicar:
- Paleta de colores: Utilicé la paleta completa (Blanco, Turquesa, Beige, Naranja suave/cremoso y Marrón cobrizo oscuro) e intenté no agregar otros colores fuera de esa paleta.
- Evidencias: Usé un fondo liso, Asteriscos (dibujados a mano alzada en el fondo), Lazos (hechos con hilo beige), Stencil y algunas perlitas.
- Testimonio: Opté por Documentar Diversión Familiar. La foto que elegí era ideal para ello!
................................................................................
For each Case, CSI always offer amazing ideas to create the Scrapboking Layout.
This is ALL you can use to solve the case! Carolina translated everything into spanish so it's easier to understand. Now you don't have any excuse to not try this! :)
These were the options I choose to use:
- Color Scheme: I used all the five colors and tried not to add any other. The colors were: White, Turquoise, Beige, Creamy Orange and Dark Redish Brown.
- Evidence: I used a plain background, asterisks, loops (made with twine), Stencil and Pearls.
- Testimony: I choose to document family fun. The photograph I was going to use was perfect for this!

Elegí también ubicar todos los elementos decorativos cerca y alrededor de la foto central, para darle aún más énfasis e interés.
................................................................................
For this Case we also had a Sketch as inspiration. As I didn't had another photograph of this captured moment, I repited and edited the photo, changing contrast and luminosity. This way, the photo in the middle is the one that captures all the attention.
I also choose to apply all the embellishments near and around the central photograph, to emphasize and give more interest to it.

Detalle del título y relato.
Cada tira de papel tiene los bordes desgastados, incluso las que están debajo de las fotos. Esto puede lograrse con el filo de una tijera o con una lija.
................................................................................
Detail of the title and journaling.
Each scrap of paper has worn edges, even those behind the photographs. This can be made with the edge of a pair of scissors or a piece of sandpaper.
................................................................................
Ahora quiero mostrarles un pequeño paso a paso de cómo creé algunos elementos de esta página y para que vean lo versátiles que son los materiales.
................................................................................
Now I want to show you a little tutorial of how I created some of the embellishments/elements of this Scrapbooking LO.

Para crear el color Marrón Cobrizo Oscuro mezclé tres colores de Brumas Brillantes en un frasquito. Esos colores fueron: Violeta Tendencias, Rojo Tendencias y Turquesa Comienzos.
Tomé una tira de papel de la lámina Beige de la Línea Comienzos, la hice un bollito y la metí en el frasquito con la mezcla de brumas.
Al haberla arrugado, se logra que el papel absorba el color de manera distinta que en las partes lisas. Queda un efecto como de papel reciclado.
Utilicé la misma técnica para crear uno de los banderines del centro de la página y la base de la palabra Ninjas, y también pinté un Cuadradito de Madera Autoadhesivo así quedaba bien al tono.
................................................................................
In order to create the Dark Redish Brown color, I mixed in a little jar three Brumas Brillantes. The colors I mixed were: Tendencias Violet, Tendencias Red and Comienzos Turquoise.
I took a long scrap of paper of the Comienzos Beige 12'' x 12'' sheet, I wrinkled it and throw it into the jar.
This way the paper is stained and looks like recicled paper.
I used the same technique to create one of the pennants and the base of the word "Ninjas", and I used the color mix to paint one Wooden self-adhesive Square.
................................................................................
También quiero mostrarles cómo utilicé las Brumas Brillantes junto con el Stencil Rejilla.
................................................................................
Also, I want to show you how I used some of the Brumas Brillantes with the rack Stencil.

Como ya había pegado varios de los elementos sobre la página y no quería que se manchen, en lugar de utilizar la bruma directamente como spray lo que hice fue aplicarla sobre una esponjita y con esa esponjita fui ponceando suavemente sobre el stencil.
Así pude controlar mucho mejor en qué sectores quería que quede la textura de la bruma y en cuáles no.
................................................................................
As I already had glued some ot the elements on the LO and I didn't want them to stain, instead of using the Bruma directly as a spray, what I did was apply some of it on a sponge and with that sponge I tapped softly on the stencil.
This way I could control better wich sections I wanted texture in and wich not.
................................................................................
Espero que tanto la página como este post les hayan gustado y que se animen a participar en CSI y en el hermoso Club CGS, donde también se comparten los casos traducidos al español así es más fácil entenderlos y resolverlos.
Al final del post les dejo la lista de materiales CGS utilizados con los links a la Tienda Online donde pueden adquirirlos.
Muchas gracias por pasar por aquí y participar comentando si es que este post te gustó y quisieras ver más trabajos o tutoriales parecidos.
¡Hasta la próxima!
................................................................................
I hope that you like this post and LO and I encourage you to participate in CSI and the wonderful CGS Club, were you will find the CSI cases translated to spanish, so it's easier to understand and solve them.
At the end of this post you will find the list of CGS supplies I used to create this page, with links to the online Shop were you can buy them.
Thank you very much for stopping by! Comment below if you liked this post and if you'd like to see more of these proyects and tutorials.
Till the next post!
................................................................................
Listado de Materiales CGS utilizados en "Mud Ninjas":
- Lámina Blanca de Base utilizada para el fondo.
- Lámina Base Beige utilizada para banderines, en una franja larga debajo de las fotos, base de la palabra Mud y Ninjas (teñida) y como alfombrita para la foto central.
- Lámina Lisa Turquesa Hitos utilizada en un banderín, como base del relato, en una franja larga debajo de las fotos.
- Minilámina Blanca utilizada como alfombrita debajo de cada foto.
- Stencil Rejilla utilizado en el fondo.
- Botón de Madera Cuadrado teñido con brumas y utilizado a la izquierda y abajo de la foto central.
- Bruma Brillante Turquesa Comienzos utilizada en la mezcla para crear el color Marrón Cobrizo Oscuro.
- Bruma Brillante Rojo Tendencias utilizada en la mezcla para crear el color Marrón Cobrizo Oscuro.
- Bruma Brillante Violeta Tendencias utilizada en la mezcla para crear el color Marrón Cobrizo Oscuro.
- Bruma Brillante Beige Vacaciones utilizada en el fondo con el Stencil Rejilla.
- Alfabeto Autoadhesivo utilizado para armar el título "Mud Ninjas".

Buenísima página! Me encantó el tip del papel reciclado de mentira!!! Me parece re útil!
ResponderEliminarMuchas gracias Cris! <3
EliminarQue gran trabajo Ariana ! te felicito !!
ResponderEliminarMuchas gracias Marina! No sabía que este era tu blog, ahora ya lo sé y puedo visitarlo :D Abrazote!
EliminarBuenísimo Ari! y qué buena idea la de sumergir el papel arrugado en la mezcla de brumas! ya quiero probarlo :)
ResponderEliminarGracias Caro! Si, la verdad es que es una gran manera de transformar las láminas!
EliminarAriana me encantan tus trabajos y sobre todo muy explicados!
ResponderEliminarMuchas gracias Ale! Me encanta nuestro Equipo! <3
EliminarAriana, quiero felicitarte doblemente por integrar el equipo de diseño y por esta hermosa pagina. me encantan tus trabajos.
ResponderEliminarMuchísimas gracias Mariana! <3
EliminarQue precioso trabajo! Sos una genia! Te admiro mucho! <3
ResponderEliminarMuchas gracias Clau! <3 Sos una dulce!
Eliminar